Where to Start
First, there's this tutorial, which is very much 'from zero to zero'. 👌

If you want a thorough understanding of CMake's mechanics and syntax, you can follow the whole tutorial. But it has a few problems:
- It's only for learning and understanding, not for production use. The tutorial is based on a learning environment, uses C++, and uses the default C compiler (clang on my machine), so what gets built is just an exe that runs only on a desktop. For production, of course, we compile with arm_gcc, or at least need to know how to specify a different GCC toolchain.
- The project structure is overly complicated, which doesn't help beginners. It's already not production-ready, and on top of that the whole software is too complex — too many CMakeLists files — so it's not beginner-friendly.
So for now, just read Steps 1 through 3.
You'll need to download the software tools involved and add their executable paths to your environment variables.
- CMake
- MinGW64
- arm-none-eabi-gcc
Or use the portable VS Code environment I've packaged on my file site.
Then use STM32CubeMX to generate a debuglink project, select CMake as the toolchain, and analyze the project it generates.
Downloading the Software Tools
For CMake and MinGW64, I recommend installing them through MSYS2's MINGW64 environment. Manual installation tends to cause dependency problems that are hard to resolve, or leaves dependencies scattered around and not modular.
After installing MSYS2, open mingw64.exe from it and run these two commands:
pacman -S mingw-w64-x86_64-make
pacman -S mingw-w64-x86_64-cmake
Once installed, add the mingw64/bin folder of MSYS2 to your system environment variable PATH.
arm-none-eabi-gcc needs to be downloaded from the official website; the one in MSYS2 is incomplete and lacks GDB.
Download it from the official Arm GNU Toolchain Downloads – Arm Developer website, or from my file mirror arm-gcc.
After extracting or installing, make sure the bin folder inside it is added to your system environment variable PATH.
A Minimal Project
Generate a simple CMake project in STM32CubeMX. The rough structure is as follows. The CMake-related parts are shown in the images.
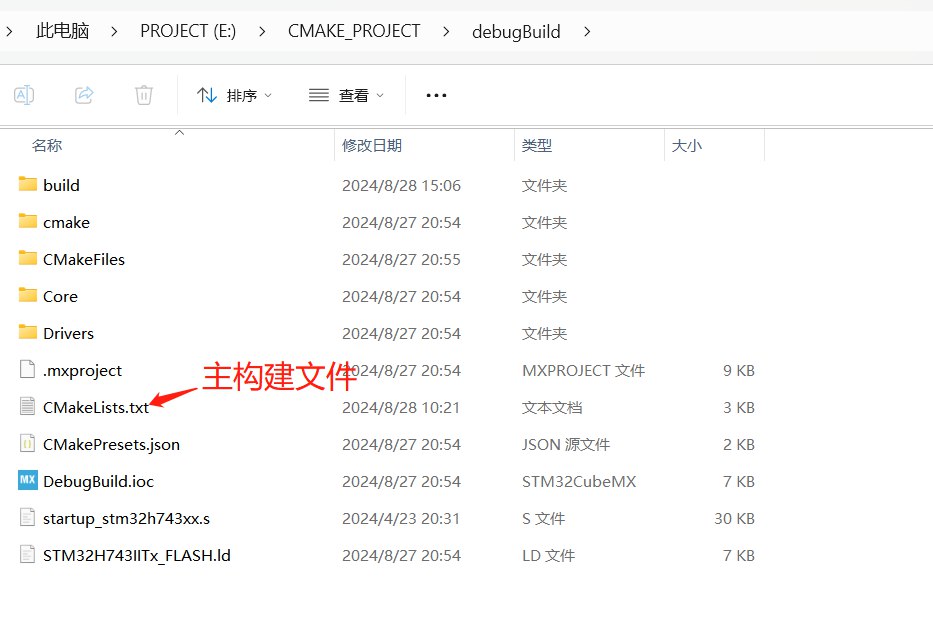
root folder
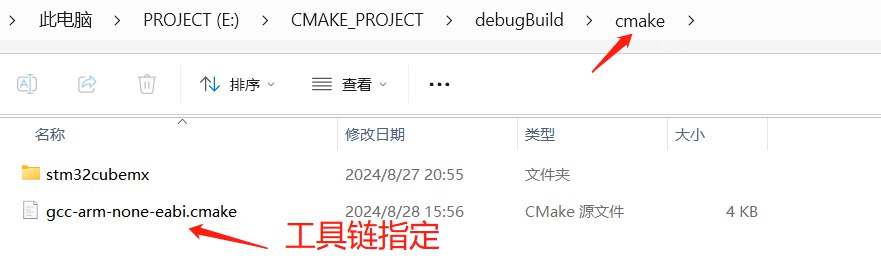
./cmake
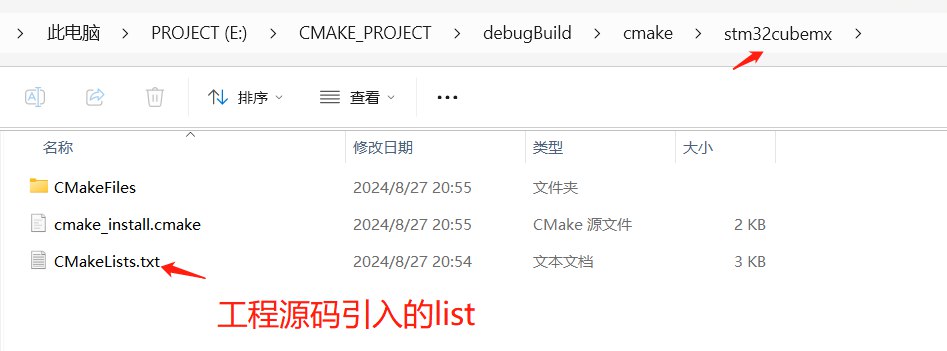
./cmake/stm32cubemx
The Main Executable Build
The generated main build file is CMakeLists.txt at the project root. This is also the CMakeLists.txt called when we use a command like cmake ../ to generate the native build system.
# 指定CMake的最低版本要求为3.22
cmake_minimum_required(VERSION 3.22)

#
# 该文件是cmake调用的主构建文件
# 用户可以根据需要自由修改此文件。
#

# 设置编译器设置部分
set(CMAKE_C_STANDARD 11)            # 设置C标准为C11
set(CMAKE_C_STANDARD_REQUIRED ON)   # 要求使用指定的C标准
set(CMAKE_C_EXTENSIONS ON)          # 启用编译器扩展


# 定义构建类型
if(NOT CMAKE_BUILD_TYPE)
    set(CMAKE_BUILD_TYPE "Debug")   # 如果未设置CMAKE_BUILD_TYPE,则默认设置为"Debug"。该参数可以在使用类似"cmake ../"生成原生构建系统时添加-DCMAKE_BUILD_TYPE=Release指定
endif()

# 设置项目名称
set(CMAKE_PROJECT_NAME DebugBuild)  # 设置项目名称为DebugBuild

# 包含工具链文件
include("cmake/gcc-arm-none-eabi.cmake")

# 启用编译命令生成,以便于其他工具进行索引例如clangd
set(CMAKE_EXPORT_COMPILE_COMMANDS TRUE) # 生成compile_commands.json,以便IDE或工具使用

# 启用CMake对ASM和C语言的支持
enable_language(C ASM)              # 启用C和汇编(ASM)语言支持

# 核心项目设置
project(${CMAKE_PROJECT_NAME})                  # 定义项目,使用之前设置的项目名称
message("Build type: " ${CMAKE_BUILD_TYPE})     # 消息输出构建类型

# 创建一个可执行对象
add_executable(${CMAKE_PROJECT_NAME})   # 定义一个可执行目标,使用项目名称

# 添加子目录部分,这会自动处理子目录中的CMakeLists.txt文件
add_subdirectory(cmake/stm32cubemx)     # 添加子目录,通常包含STM32CubeMX生成的代码

# 链接目录设置
target_link_directories(${CMAKE_PROJECT_NAME} PRIVATE
    # 添加用户定义的库搜索路径
    # e.g., "/path/to/libs"
)

# 向可执行目标添加源文件
target_sources(${CMAKE_PROJECT_NAME} PRIVATE
    # 添加额外的源文件
    # e.g., "src/main.c"
)

# 添加包含路径
target_include_directories(${CMAKE_PROJECT_NAME} PRIVATE
    # 添加用户定义的包含路径
    # e.g., "include"
)

# 添加项目符号(宏)
target_compile_definitions(${CMAKE_PROJECT_NAME} PRIVATE
    # 添加用户定义的符号
    # e.g., "MY_MACRO=1"
)

# 添加链接库
target_link_libraries(${CMAKE_PROJECT_NAME}
    stm32cubemx # 链接stm32cubemx库 实际上也是以project()项目的形式存在,此前的add_subdirectory(cmake/stm32cubemx)引入了这名为stm32cubemx的库,该目录下的CMakeLists.txt文件中定义了这个库

    # 添加用户定义的库
    # e.g., "mylib"
)
Note that this CMakeLists.txt doesn't directly include any source code; it just defines some configuration. You should keep it that way when modifying the main build's CMakeLists.txt later.
It has
add_subdirectory(cmake/stm32cubemx)

......

target_link_libraries(${CMAKE_PROJECT_NAME}
    stm32cubemx
)
These two parts bring in all the source files indirectly. Under cmake/stm32cubemx there is another CMakeLists.txt, which defines a project named stm32cubemx and pulls in all the include paths and source files. It's included indirectly through targetlinklibraries, and I'll go into that file in more detail later.
Specifying the Toolchain
The main build contains this line:
include("cmake/gcc-arm-none-eabi.cmake")
This line pulls in the gcc-arm-none-eabi.cmake file from the ./cmake folder. Here include works the same way as in C: it's just text substitution. The entire contents of gcc-arm-none-eabi.cmake are substituted into that line, which is how the toolchain gets specified. The file looks like this:
# 设置系统名称和处理器架构
set(CMAKE_SYSTEM_NAME               Generic)
set(CMAKE_SYSTEM_PROCESSOR          arm)        # 设置处理器架构为arm

# 强制指定编译器
set(CMAKE_C_COMPILER_FORCED TRUE)       # 强制指定C编译器
set(CMAKE_CXX_COMPILER_FORCED TRUE)     # 强制指定C++编译器
set(CMAKE_C_COMPILER_ID GNU)            # 设置C编译器ID为GNU
set(CMAKE_CXX_COMPILER_ID GNU)          # 设置C++编译器ID为GNU


# 一些默认的GCC设置,要求arm-none-eabi-xx必须在PATH环境变量中
set(TOOLCHAIN_PREFIX                arm-none-eabi-) # 设置工具链前缀为arm-none-eabi-

# 设置各个工具的路径和名称
set(CMAKE_C_COMPILER                ${TOOLCHAIN_PREFIX}gcc)     # 设置C编译器
set(CMAKE_ASM_COMPILER              ${CMAKE_C_COMPILER})        # 设置汇编编译器,使用C编译器
set(CMAKE_CXX_COMPILER              ${TOOLCHAIN_PREFIX}g++)     # 设置C++编译器
set(CMAKE_LINKER                    ${TOOLCHAIN_PREFIX}g++)     # 设置链接器
set(CMAKE_OBJCOPY                   ${TOOLCHAIN_PREFIX}objcopy) # 设置对象复制工具
set(CMAKE_SIZE                      ${TOOLCHAIN_PREFIX}size)    # 设置大小计算工具

# 设置生成的可执行文件的后缀
set(CMAKE_EXECUTABLE_SUFFIX_ASM     ".elf")     # 设置汇编可执行文件后缀为.elf
set(CMAKE_EXECUTABLE_SUFFIX_C       ".elf")     # 设置C可执行文件后缀为.elf
set(CMAKE_EXECUTABLE_SUFFIX_CXX     ".elf")     # 设置C++可执行文件后缀为.elf

# 设置尝试编译的目标类型为静态库
set(CMAKE_TRY_COMPILE_TARGET_TYPE STATIC_LIBRARY)   # 设置尝试编译的目标类型为静态库

# MCU-specific 编译标志
set(TARGET_FLAGS "-mcpu=cortex-m7 -mfpu=fpv5-d16 -mfloat-abi=hard ")    # 设置目标平台的特定编译标志

# 设置C编译标志
set(CMAKE_C_FLAGS "${CMAKE_C_FLAGS} ${TARGET_FLAGS}")   # 添加目标平台特定的编译标志到C编译器标志(基于原有标志添加)
set(CMAKE_C_FLAGS "${CMAKE_C_FLAGS} -Wall -Wextra -Wpedantic -fdata-sections -ffunction-sections") # 添加更多编译器标志

# 根据构建类型设置不同的优化级别
if(CMAKE_BUILD_TYPE MATCHES Debug)
    set(CMAKE_C_FLAGS "${CMAKE_C_FLAGS} -O0 -g3")    # 如果是Debug构建类型,设置为O0无优化并g3生成调试信息
endif()
if(CMAKE_BUILD_TYPE MATCHES Release)
    set(CMAKE_C_FLAGS "${CMAKE_C_FLAGS} -O3 -g0")    # 如果是Release构建类型,设置为O3优化并g0不生成调试信息
endif()

# 设置汇编编译标志
set(CMAKE_ASM_FLAGS "${CMAKE_C_FLAGS} -x assembler-with-cpp -MMD -MP")  # 设置汇编编译标志

# 设置C++编译标志
set(CMAKE_CXX_FLAGS "${CMAKE_C_FLAGS} -fno-rtti -fno-exceptions -fno-threadsafe-statics")   # 添加C++编译标志,禁用RTTI、异常和线程安全静态变量

# 设置C链接器标志
set(CMAKE_C_LINK_FLAGS "${TARGET_FLAGS}")   # 添加目标平台特定的编译标志到链接器标志
set(CMAKE_C_LINK_FLAGS "${CMAKE_C_LINK_FLAGS} -T \"${CMAKE_SOURCE_DIR}/STM32H743IITx_FLASH.ld\"")   # 添加链接脚本
set(CMAKE_C_LINK_FLAGS "${CMAKE_C_LINK_FLAGS} --specs=nano.specs")   # 使用nano.specs配置
set(CMAKE_C_LINK_FLAGS "${CMAKE_C_LINK_FLAGS} -Wl,-Map=${CMAKE_PROJECT_NAME}.map -Wl,--gc-sections")    # 生成映射文件并移除未使用的部分
set(CMAKE_C_LINK_FLAGS "${CMAKE_C_LINK_FLAGS} -Wl,--start-group -lc -lm -Wl,--end-group")   # 链接C库和数学库
set(CMAKE_C_LINK_FLAGS "${CMAKE_C_LINK_FLAGS} -Wl,--print-memory-usage")    # 打印内存使用情况s's

# 设置C++链接器标志
set(CMAKE_CXX_LINK_FLAGS "${CMAKE_C_LINK_FLAGS} -Wl,--start-group -lstdc++ -lsupc++ -Wl,--end-group")   # 添加C++特定的链接标志,链接标准C++库
As you can see, it specifies the compile toolchain and sets compiler arguments one by one. For example, to add -masm=auto for the assembler, you can add the following after this line:
set(CMAKE_ASM_FLAGS "${CMAKE_C_FLAGS} -x assembler-with-cpp -MMD -MP") # 设置汇编编译标志
then add
set(CMAKE_ASM_FLAGS "${CMAKE_ASM_FLAGS} -masm=auto") # 设置汇编器自动识别汇编语法
${CMAKE_ASM_FLAGS} here means all previously set CMAKE_ASM_FLAGS values are put in front, giving you the effect of adding extra flags.
Bringing In the Project Sources
In the first two files, we've specified CMake's build configuration and the toolchain settings. Now we need to bring in the actual source files.
The main build contains this line:
add_subdirectory(cmake/stm32cubemx)
This brings in all of ./cmake/stm32cubemx; in fact, only CMakeLists.txt has any real effect, and the other files do nothing, so you can ignore them. The file looks like this:
# 设置CMake的最低版本要求
cmake_minimum_required(VERSION 3.22)

# 定义项目名称为stm32cubemx
project(stm32cubemx)

# 添加一个INTERFACE库,INTERFACE库不生成实际编译产物,只提供编译选项给依赖它的目标
add_library(stm32cubemx INTERFACE)

# 启用C和汇编语言支持
enable_language(C ASM)

# 为stm32cubemx目标添加编译定义
target_compile_definitions(stm32cubemx INTERFACE
    USE_HAL_DRIVER              # 定义USE_HAL_DRIVER宏
    STM32H743xx                 # 定义STM32H743xx宏
    $<$<CONFIG:Debug>:DEBUG>    # 如果是Debug配置,定义DEBUG宏。这里的$<CONFIG:Debug>比较迷惑,实际上CONFIG对应的就是CMAKE_BUILD_TYPE属性
)

# 为stm32cubemx目标添加包含目录
target_include_directories(stm32cubemx INTERFACE
    ../../Core/Inc
    ../../Drivers/STM32H7xx_HAL_Driver/Inc
    ../../Drivers/STM32H7xx_HAL_Driver/Inc/Legacy
    ../../Drivers/CMSIS/Device/ST/STM32H7xx/Include
    ../../Drivers/CMSIS/Include
)

# 为stm32cubemx目标添加源文件
target_sources(stm32cubemx INTERFACE
    ../../Core/Src/main.c
    ../../Core/Src/gpio.c
    ../../Core/Src/stm32h7xx_it.c
    ../../Core/Src/stm32h7xx_hal_msp.c
    ../../Drivers/STM32H7xx_HAL_Driver/Src/stm32h7xx_hal_cortex.c
    ../../Drivers/STM32H7xx_HAL_Driver/Src/stm32h7xx_hal_rcc.c
    ../../Drivers/STM32H7xx_HAL_Driver/Src/stm32h7xx_hal_rcc_ex.c
    ../../Drivers/STM32H7xx_HAL_Driver/Src/stm32h7xx_hal_flash.c
    ../../Drivers/STM32H7xx_HAL_Driver/Src/stm32h7xx_hal_flash_ex.c
    ../../Drivers/STM32H7xx_HAL_Driver/Src/stm32h7xx_hal_gpio.c
    ../../Drivers/STM32H7xx_HAL_Driver/Src/stm32h7xx_hal_hsem.c
    ../../Drivers/STM32H7xx_HAL_Driver/Src/stm32h7xx_hal_dma.c
    ../../Drivers/STM32H7xx_HAL_Driver/Src/stm32h7xx_hal_dma_ex.c
    ../../Drivers/STM32H7xx_HAL_Driver/Src/stm32h7xx_hal_mdma.c
    ../../Drivers/STM32H7xx_HAL_Driver/Src/stm32h7xx_hal_pwr.c
    ../../Drivers/STM32H7xx_HAL_Driver/Src/stm32h7xx_hal_pwr_ex.c
    ../../Drivers/STM32H7xx_HAL_Driver/Src/stm32h7xx_hal.c
    ../../Drivers/STM32H7xx_HAL_Driver/Src/stm32h7xx_hal_i2c.c
    ../../Drivers/STM32H7xx_HAL_Driver/Src/stm32h7xx_hal_i2c_ex.c
    ../../Drivers/STM32H7xx_HAL_Driver/Src/stm32h7xx_hal_exti.c
    ../../Drivers/STM32H7xx_HAL_Driver/Src/stm32h7xx_hal_tim.c
    ../../Drivers/STM32H7xx_HAL_Driver/Src/stm32h7xx_hal_tim_ex.c
    ../../Core/Src/system_stm32h7xx.c
    ../../Core/Src/sysmem.c
    ../../Core/Src/syscalls.c
    ../../startup_stm32h743xx.s
)

# 为stm32cubemx目标添加链接目录
target_link_directories(stm32cubemx INTERFACE
)

# 为stm32cubemx目标添加链接库
target_link_libraries(stm32cubemx INTERFACE
)

# 验证STM32CubeMX生成的代码是否兼容C标准,如果低于C11则报错
if(CMAKE_C_STANDARD LESS 11)
    message(ERROR "Generated code requires C11 or higher") # 由于hal库有诸多可覆盖定义的函数,必须C11标准支持
endif()
So here is where the actual source files and include directories are brought in, under the CMake project name stm32cubemx. Remember this part from the main build?
add_subdirectory(cmake/stm32cubemx)

......

target_link_libraries(${CMAKE_PROJECT_NAME}
    stm32cubemx
)
The CMake project stm32cubemx handles everything related to pulling in the sources.
Configuring CMake in VS Code
1. Configuration File
Download the CMake configuration file from the site below and import it into VS Code:
2. Update User Settings
After importing the configuration file, it will download many required extensions. You'll need to modify the user settings and add the paths of each toolchain to the appropriate settings.
Enable the configuration file you imported in the previous step. In the settings (User tab), search for arm toolchain path; there will be an entry like this:
Cortex-debug: Arm Toolchain Path
Path to the GCC Arm Toolchain (standard prefix is "arm-none-eabi" - can be set through the armToolchainPrefix setting) to use. If not set the tools must be on the system path. Do not include the executable file name in this path.
Click Edit in settings.json below this entry and edit it as follows, changing the path to the bin directory of your arm-none-eabi-gcc installation.
"cortex-debug.armToolchainPath": "C:\\111_APPS\\arm-gnu-toolchain-13.2.Rel1-mingw-w64-i686-arm-none-eabi\\bin",
In the settings (User tab), search for JLink GDBServer Path; there will be an entry like this:
Cortex-debug: JLink GDBServer Path
Path to the JLink GDB Server. If not set then JLinkGDBServer (JLinkGDBServerCL.exe on Windows) must be on the system path.
Click Edit in settings.json below this entry and edit it as follows, changing the path to the location of your JLinkGDBServerCL.exe. The examples I give are usually written as JLink debug tasks and use JLink's RTT printing, so they use JLinkGDBServer. If you use OpenGDBServer, modify the corresponding GDBServerPath yourself; it may just be more difficult to write debug tasks.
"cortex-debug.JLinkGDBServerPath": "C://111_APPS//SEGGER//JLink_V794f//JLinkGDBServerCL.exe",
3. Write VS Code Tasks
To debug both the CMake scripts and the program, you need to write your own debug tasks. Put the following in the "launch" section of the .workspace file; if there is no "launch" section, you can write it at the bottom.
"launch": {
    "version": "0.2.0",
    "configurations": [
        {
            "name": "CMake: Script debugging",
            "type": "cmake",
            "request": "launch",
            "cmakeDebugType": "configure"
        },
        {
            "cwd": "${workspaceRoot}",
            "executable": "./build/H7_GCC_BASE.elf",
            "name": "Debug with JLink",
            "request": "launch",
            "type": "cortex-debug",
            "device": "STM32H743II",
            // "runToEntryPoint": "Reset_Handler",
            "runToEntryPoint": "main",
            "showDevDebugOutput": "none",
            "servertype": "jlink",
            "interface": "swd",
            "svdFile": "../../src/5_PhysicalChip/CPU/STM32H743.svd",
            "liveWatch": {
                "enabled": true,
                "samplesPerSecond": 4
            },
            "rttConfig": {
                "enabled": true,
                "address": "auto",
                "decoders": [
                    {
                        "label": "",
                        "port": 0,
                        "type": "console"
                    }
                ]
            },
        }
    ]
}
Fill the "executable" field with the actual build output, "device" with the actual chip model, and "svdFile" with the actual location of the SVD file (if you don't have one, delete this entry).
This creates two tasks, one for debugging the CMake generation script and one for debugging the program. In the VS Code debug window, select the corresponding task and start it.
Summary
The CMake project generated by STM32CubeMX is, in my opinion, very reasonable and easy to understand. It's clearly split into three parts:
- Main executable build: defines the generic configuration of the CMake project, such as the C standard, whether to use C++ and other compilers, and other source-unrelated things, and pulls in the other two parts.
- Toolchain specification: defines which compiler to use; it varies with the target platform.
- Source inclusion: this layer is similar to using any other IDE; you just define the source files, include directories, and global defines one by one.
The reason I wanted to switch to CMake is that the project has become larger and larger, and I want to modularize each software feature into an independent, manageable unit. IDEs are still a bit lacking when it comes to splitting software into packages. With CMake, each functional module can have its own CMakeLists; everything except the hardware drivers can be abstracted to be platform-independent.
Going Further
My Modbus protocol stack demonstrates an advanced way to structure a functional module.
The functional library's CMakeLists.txt is as follows:
cmake_minimum_required(VERSION 3.22)

project(MODBUSX)
add_library(modbusx INTERFACE) # INTERFACE意味着这个库本身并不会被编译,而是作为依赖被其他目标使用,以便于MBx_user.h可以自己定义并且对库行为进行变更

# 递归查找所有源码文件
file(GLOB_RECURSE SRC ${CMAKE_CURRENT_LIST_DIR}/source/*.c)
# 非递归的案例
# file(GLOB SRC ${CMAKE_CURRENT_LIST_DIR}/source/*.c)


target_include_directories(modbusx INTERFACE
    ${CMAKE_CURRENT_LIST_DIR}/include
    ${CMAKE_CURRENT_LIST_DIR}/../port/generic/inc
)

target_sources(modbusx INTERFACE
     ${SRC}
)

if(CMAKE_C_STANDARD LESS 11)
    message(ERROR "Generated code requires C11 or higher")
endif()
And the main build calls it like this:
add_subdirectory(${CMAKE_CURRENT_LIST_DIR}/common)     # 添加子目录

# 设置要包含和定义的参数
set(MY_INCLUDE_DIR ${CMAKE_CURRENT_LIST_DIR}/Example/win_test)
set(MY_DEFINITIONS MBX_INCLUDE_USER_DEFINE_FILE)

# 配置目标和链接属性
function(configure_target target_name source_file)
    add_executable(${target_name} ${source_file})

    target_compile_definitions(${target_name} INTERFACE  ${MY_DEFINITIONS})
    target_compile_definitions(${target_name} PRIVATE  ${MY_DEFINITIONS})
    target_include_directories(${target_name} INTERFACE ${MY_INCLUDE_DIR})
    target_include_directories(${target_name} PRIVATE ${MY_INCLUDE_DIR})
    target_link_libraries(${target_name} PRIVATE modbusx)

    # 添加链接器选项
    target_link_options(${target_name} PRIVATE
        -Wl,-Map=${target_name}.map
        -Wl,--gc-sections
    )
endfunction()

# 配置每个可执行文件
configure_target(RTU_Mmain ${CMAKE_CURRENT_LIST_DIR}/Example/win_test/RTU_Mmain.c)
First, the sub-build is an INTERFACE library, because it's a functional library: it can't run standalone, but needs to be called by an actual application.
The example main build shows how to use the library. It uses the INTERFACE and PRIVATE attributes for both the defines and the include paths.
The INTERFACE label here means it takes effect in the sub-build, but not in this main build. The PRIVATE label here means it takes effect only in the main build, but not in the sub-build.
So in fact the settings take effect in both CMakeLists.txt files. You can use the PUBLIC attribute to represent "effective in both"; the example is just doing fine-grained control.